We are now publishing here.
Please update your links to point to https://brothersoffire.home.blog/
Thanks!
Tuesday 15 October 2019
Friday 28 June 2019
Old School Rules FAQ July 2019 - by Brother Scott
Old School Rules FAQ v1.1
(Editor's note: This was one of our most popular articles, and in service to the community, Brother Scott has devoted additional time to an update with some new material and clarifications. Enjoy everyone!)
Scott Latham – June 2019
In the glorious sunshine of the Urborg Feast outdoor tournament in Gothenburg this April this year I had the pleasure of doing something I’d never done before – judging at an Old School tournament.
This was, I admit, not an onerous exercise – I think between us the three judges only had ten judge calls all day. However, the recurring themes about what was asked – and questions I’ve seen from other puzzled mages posting on the internet – guided me into thinking that it would be helpful to set out some tips about the Old School cards and rules that cause the most confusion.
I hope that you will be able to use this article in two ways:
- To dip into now to give you some ideas of possible extra fun ways to use your favourite cards (or play cards correctly with confidence that you’ve always been a bit unsure about).
- As a future reference source if you’re in the middle of a game and suddenly think “oh – how does THIS work?” (add this article to your Favourites!) The tips are all alphabetised by card name/ability to help with this.
Just one warning: the rules of Magic change from time to time – these rulings are all correct as of May 2019 and apply if you’re playing Old School using the current Magic rules. If you’re playing Alpha 40 using the original Alpha rules, or playing some other local variation, then of course these answers may not all hold true. I have deliberately used some old school terminology because I find that phrases such as “fizzle,” “summoning sickness” and “removed from the game” are not only more evocative but clearer – but that’s just description: the outcomes are those produced by the current Rules.
Finally, huge thanks to Dave Firth Bard and Chris Cooper for their proofreading and valuable suggestions and additions.
The Abyss
Q1: Can I regenerate my Sedge Troll to save it from The Abyss?
No – The Abyss says on it that creatures it targets can’t be regenerated! (You can pay one black mana if you really want to use the regeneration ability, but the Troll will still die.)
Q2: Can The Abyss destroy a White Knight, bearing in mind it has Protection from Black?
No it can’t – The Abyss requires a target, and a black card can’t target something with Protection from Black. Another target must be chosen, if possible.
Banding
Banding boils down to two things:
- When attacking - Any number of creatures with banding plus up to one creature without banding can be chosen to form a band when attacking. Then (a) if one creature in an attacking band is blocked, the whole band is blocked, but also (b) the controller of the band gets to decide how damage from the blocking creature(s) is distributed among creatures in the band. Point (a) is a drawback, but point (b) can be quite useful to you in combat.
- When blocking – If a creature with Banding is blocking a creature, either alone or with other blockers, the Banding creature’s controller chooses how any damage dealt by the blocked creature is assigned.
For some attacking examples let’s imagine as an example that you choose to form a band consisting of two creatures: Mesa Pegasus (1/1 flying banding) and War Mammoth (3/3 trample), and then attack.
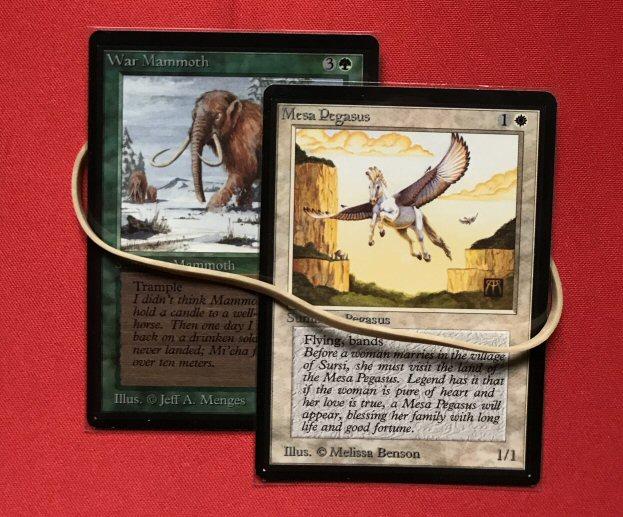
Q1: Can a creature without flying block my band?
Yes. The mammoth doesn’t have flying, and if your opponent blocks it (say, with a 5/4 Water Elemental) the whole band is then blocked due to point (a) above.
Q2: If he does block like that, can I choose all 5 damage of the Water Elemental’s damage to be dealt to the Pegasus?
Yes. Point (b) above means you get to assign the damage, and can assign all 5 to Mesa Pegasus even though that’s more than enough to kill it. The Water Elemental will take 4 damage and die, so you’ll end up trading a Pegasus for the Elemental, and the War Mammoth will survive (you could also choose the Mammoth to take the 5 damage if you preferred the Pegasus to survive).
Q3: What happens if I block a creature with Trample using a creature with Banding?
Let’s say a Force of Nature (8/8 trample) is attacking, and you block with your Mesa Pegasus and War Mammoth. Normally your opponent would choose to deal 1 damage to the Pegasus, 3 to the Mammoth, and 4 trample damage to you. But with banding YOU get to choose how damage is done. So you can choose to assign all 8 damage to the Mesa Pegasus (or the Mammoth). If you do, none will trample over to you or kill your other creature. Even if you chump block with just the Mesa Pegasus you can still choose for it to take all 8 damage, with none trampling over.
Blood Moon
Q1: My opponent plays Blood Moon and in response I activate my Mishra’s Factory to make it a 2/2 creature. What is it once Blood Moon resolves?
Until the end of the turn it’s a mountain that’s also a 2/2 artifact creature. Note that it will no longer have its other abilities, including the ability to give an assembly worker +1/+1. From the next turn onwards it becomes simply a mountain, and no longer a creature.
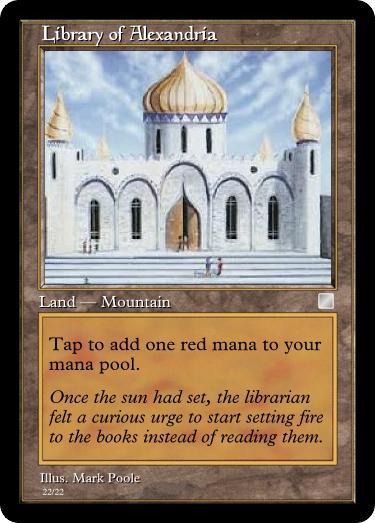
Q2: My opponent has both Blood Moon and Library of Alexandria in play. I play City in a Bottle. Does my opponent have to sacrifice her Library?
Yes. Although it’s now a mountain, its NAME is still “Library of Alexandria”, and because Library of Alexandria was first printed in Arabian Nights it has to be sacrificed.
Chains of Mephistopheles
The effect of this card is best visualised as a flow chart, such as this one created by the user “silvercut” on mtgsalvation:
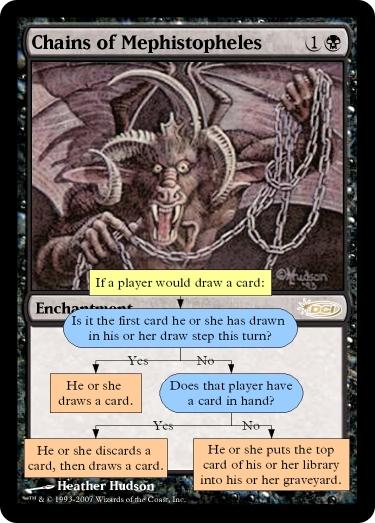
Q: What happens if there are two copies of Chains of Mephistopheles in play?
The player’s first card drawn in their draw step is still unaffected. Otherwise, any time that a player would draw a card, they go through the flowchart instead. What this means in practice is:
- If the player doesn’t have any cards in hand, then Chains #1 causes the draw to be replaced by milling 1 card. Chains #2 has no effect since the player is no longer drawing a card (they’re milling one instead).
- If the player has two or more cards in their hand they will end up having to discard two cards (one to each copy of Chains) before being allowed to draw one.
- If the player has exactly one card in hand then they will have to discard it to Chains #1. Chains #2 now sees them as having no cards in hand, so then replaces the card draw with milling a card instead.
If a player would draw multiple cards (for example, due to Ancestral Recall or Timetwister) remember “draw 3 cards” is really just “draw a card” three times, so follow the flowchart and bullet points above for each card draw one at a time.
Chaos Orb
Note also the most commonly used errata for Chaos Orb in old school does not “target”, but rather says “1, Tap: Choose a nontoken permanent on the battlefield….”. This means that when activating Chaos Orb you don’t need to say what you’re going to flip it at until the ability actually resolves. If your opponent responds to the Chaos Orb’s activation (for example, by removing counters from the Triskelion you were thinking of destroying, say) you can change your mind and flip it at something else. You only have to say what you’re aiming at just before you flip it.
Q1: My opponent activates his Chaos Orb – if I Disenchant it in response, will that stop its ability?
Yes. When the opponent activates the Orb its ability goes on the stack. If you disenchant the Orb in response then when its ability resolves there is no Orb in play any more to flip onto the table. The Orb’s ability will therefore fizzle.
Q2: If I play Disenchant to destroy the Orb, is my opponent allowed to respond by using it?
Yes. Disenchant goes on the stack, and they can use the Orb in response – in which case the Orb will do its flip and potentially destroy something before Disenchant resolves. By the time Disenchant resolves the Orb is gone and Disenchant will just fizzle.
Q3: My opponent’s Chaos Orb flip has landed so that just the very edge of the Orb’s sleeve is touching the very edge of my Serra Angel’s sleeve – is it still destroyed?
Yes – card sleeves count as the card, so the Angel is destroyed. 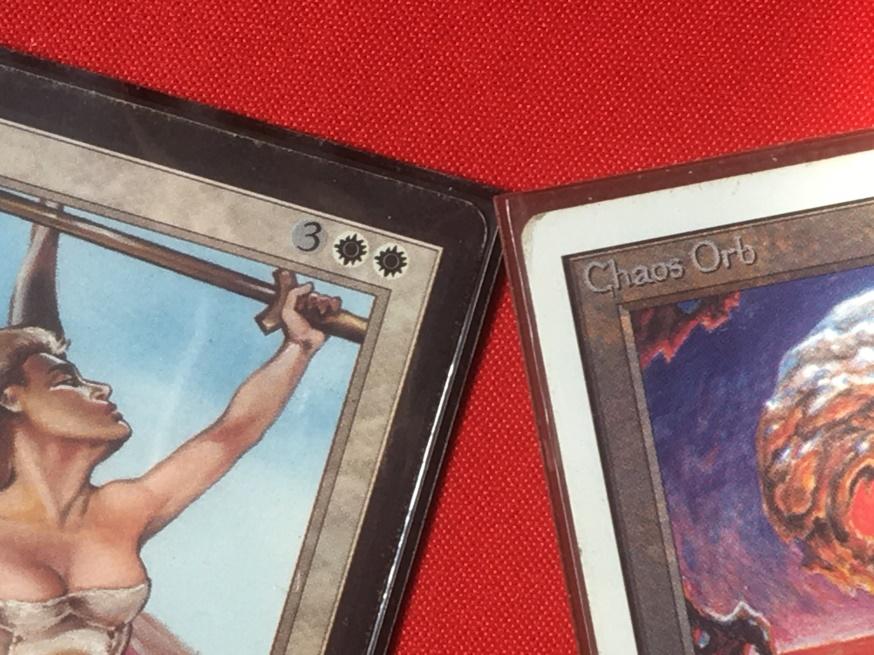
Q4: Can I wait to see what the Orb is aiming for and whether it hits before I use Triskelion’s counters / pay B to regenerate my Sedge Troll / sacrifice something to pump my Atog etc?
No. Once the Orb is flipped the ability has resolved, and if it hits then the chosen card is destroyed. If you want to do any of those things you have to do it in response to the Orb being activated, not after the flip has already happened.
Q5: I want to use Chaos Orb to destroy a wasp from The Hive, but my opponent is using a dice as a token. Does she have to switch it for a card for the purposes of the flip?
Chaos Orb can only target cards and not tokens – you can’t use it to target a wasp!
City in a Bottle
Q1: My opponent is using Mountains from the Arabian Nights set. Does she have to sacrifice them when I play City in a Bottle?
No. Only cards first printed in Arabian Nights are sacrificed, and Mountain was in Alpha/Beta and Unlimited too.
Q2: If a City in a Bottle is in play can I play a second City in a Bottle?
No. The card actually says “While City in a Bottle is in play, no further cards from Arabian Nights can be played” and that includes playing more copies of City in a Bottle itself.
Q3: What happens if two or more Cities in a Bottle end up in play at the same time, perhaps because someone used Copy Artifact, or Eureka caused both players to put a City in a Bottle into play?
They will all be sacrificed. City in a Bottle #1 causes City in a Bottle #2 to be sacrificed (and vice versa).
Q4: Does City in a Bottle kill my Rukh token?
No – as written only CARDS from Arabian Nights are sacrificed, and tokens are not cards. This is still true under the latest Oracle wording which says “Whenever another nontoken permanent with a name originally printed in the Arabian Nights expansion is on the battlefield, its controller sacrifices it.”
City of Brass
Q: I’m on 1 life and my opponent is on 3. Can I use a red mana from City of Brass to kill them with Lightning Bolt or Chain Lightning, or would that kill me?
You can tap City of Brass to generate a red mana. This will put a trigger on the stack for you to be dealt 1 damage. You can respond to that trigger by playing Lightning Bolt to kill your opponent. However, you CANNOT respond to that trigger by playing Chain Lightning, because it’s a Sorcery, so it can only be played when the stack is empty.
Copy Artifact
TIP: I find it easiest to think about any copy effects (Copy Artifact, Clone etc) as if the copy is literally a copy of the card, rather than a copy of what’s on the battlefield. So just imagine that rather than copying it, you’ve ripped open a pack, taken one out, and put it into play.
Q1: Can I copy a Mishra’s Factory that’s currently activated and hence is an artifact? If so what’s the copy?
The copy is an (unactivated) Mishra’s Factory, exactly as if you’d just played a Mishra’s Factory fresh from a pack (except that it's also an enchantment as well, because Copy Artifact says so).
Q2: If I copy a Triskelion with no counters left, how many counters does the copy have?
Three. Again, just imagine you’ve played a brand new Triskelion.
Q3: If I play Copy Artifact hoping to copy a Su Chi, but the opponent destroys Su Chi in response, when Copy Artifact resolves does it fizzle or can I/must I choose something else?
You only choose what to copy when it resolves (it doesn’t target) so if there’s another artifact in play, you can choose to copy that instead. If there are no other artifacts in play (or you choose not to copy anything) then Copy Artifact will just come into play as a blue enchantment that does nothing (it will NOT fizzle and go to the graveyard!).
Earthquake
Q: I’m on 3 life and my opponent is on 5 life. I cast Earthquake for 5. What’s the result of the game?
It’s a draw. The damage happens at the same time, so you go to -2 and your opponent to 0 simultaneously. When the game checks the situation it simply sees that both players are dead, and so calls it a draw. Psionic Blast and Hurricane can cause the same effect.
Energy Flux
Q1: Can I not pay the upkeep on Su Chi, then use its 4 mana to pay for other artifacts?
Yes. If Energy Flux is in play all your artifacts have a trigger that says "At the beginning of your upkeep, sacrifice this artifact unless you pay 2." You can stack those triggers in any order you like, which means you can stack them such that Su Chi’s resolves first, and you can sacrifice him to get 4 mana to pay for other triggers.
Q2: If I destroy Energy Flux in my upkeep (i.e. in response to the triggers) do I still have to pay 2 or lose each artifact?
Yes. Even if the Energy Flux is destroyed, its triggers will still be on the stack.
Fork
Q: If Time Walk is forked, who gets the next turn? And who gets the one after that?
Imagine that future turns form a queue, and any new extra turn effects join the queue by pushing their way to the front, such that the most recently-created extra turn is always the next one to occur.
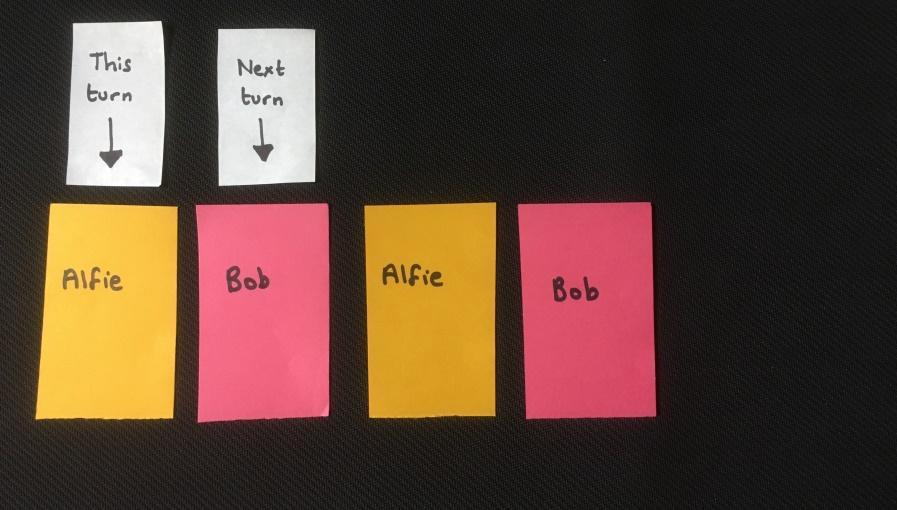
For example - let’s say that the following happens:
It’s Alfie’s turn. This means that normally the next turn would be his opponent Bob to play. The front of the turn queue is therefore “Bob’s next turn” followed by “Alfie’s next turn” (and then alternating).
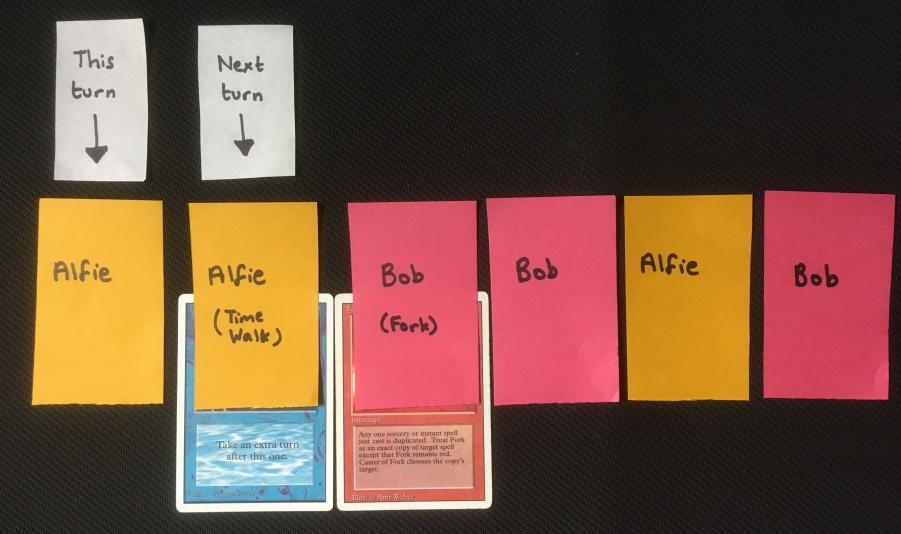
Alfie plays Time Walk. In response Bob plays Fork to copy Time Walk. Fork resolves first as it’s on top of the stack, causing a new turn to join the queue called “Bob’s Fork turn” which pushes to the front. However, immediately after that Time Walk then resolves, creating a further new turn “Alfie’s Time Walk turn” which again pushes to the front.
This means that the queue will then be “Alfie’s Time Walk turn”, followed by “Bob’s Fork turn”, followed by the rest of the previous queue i.e. “Bob’s next turn” then “Alfie’s next turn” etc.
Thinking about that queue then makes the answer clear - when this turn ends Alfie has another turn (his second in a row), after which Bob has two turns in a row, after which it returns to normal.
Fungusaur
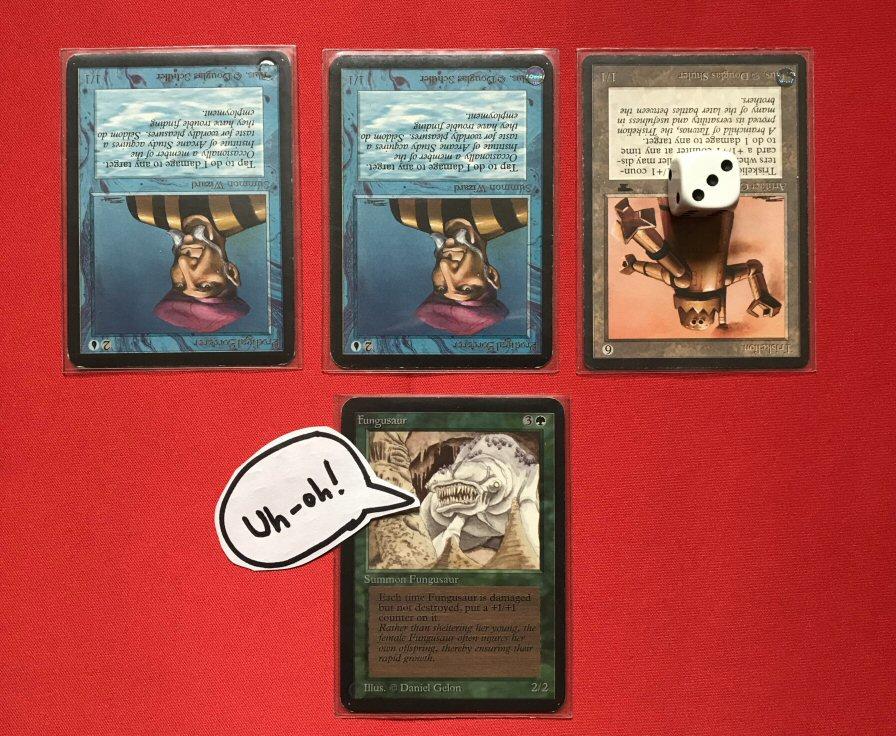
Q: Can I kill a 2/2 or 3/3 Fungusaur with Triskelion, or does targeting it just make it bigger as fast as I damage it?
You can kill it if you’re crafty. Remove a counter from Triskelion to deal Fungusaur 1 damage. This creates a trigger for Fungusaur to get a +1/+1 counter. However, you can then respond to the trigger to remove another counter to deal another 1 damage before the trigger resolves. That will kill Fungusaur if it’s a 2/2. If it already has a counter, you simply repeat the process to deal it a third damage. Multiple Prodigal Sorcerers can kill a Fungusaur in the same way.
Icy Manipulator
Q1: My opponent activates his Icy – if I Disenchant it in response, will that stop its ability?
No. You can play Disenchant targeting the Icy in response to the activation if you want to, and the Icy will be destroyed, but its ability is already on the stack, and when the ability resolves it will still tap whatever was targeted even though the Icy is now gone.
Q2: If I play Disenchant to destroy an Icy, is my opponent allowed to respond by using it?
Yes. The Icy will be destroyed, but its ability will still resolve and tap whatever was targeted.
Island Sanctuary
TIP: Don’t forget that you’re allowed to skip any card draw that happens in your draw phase to get this effect. This could be your normal card draw for the turn, but could equally be any other Instant-speed card or ability that would otherwise draw you a card, such as: Howling Mine, Sylvan Library, Jayemdae Tome, Library of Alexandria etc as long as it occurs in your draw step. Note that if an effect causes you to draw multiple cards you only need to skip one (for example, you can play Ancestral Recall and draw two of the cards before deciding whether or not to skip the third one to use Island Sanctuary).
Land Tax
You can only search for basic lands with Land Tax, so you can’t search out dual lands such as Savannah (yes it’s a Plains and a Forest – but it isn’t a BASIC Plains or a BASIC Forest). You need to reveal which lands you chose to your opponent to prove it really was basic lands that you searched out.
As long as Land Tax triggers you have the option of searching through your library and shuffling it afterwards. “Up to three” lands can be zero, which means that you can ‘search’ your library even if you know for sure that there aren’t any basic lands left in it or don’t want to take any, for example if you just want a reason to shuffle your library.
Cards searched out by Land Tax are not “drawn,” so they don’t trigger Underworld Dreams, they don’t interact with Chains of Mephistopheles and they can’t be put back onto your library with Sylvan Library later in the turn.
Maze of Ith
TIP: Whilst players normally use the Maze to untap an opponent’s creature before it has a chance to deal combat damage, don’t forget that a creature continues to be “attacking” right up to the End of Combat Step – which is after combat damage has been dealt (its the same step when Desert can be used to deal 1 damage). This means that you can attack with one of your creatures, deal damage, and then use the Maze of Ith to untap it in the End of Combat Step. This can be a useful way to untap a creature that otherwise would be costly or impossible to untap (eg Colossus of Sardia, or due to Paralyze or Meekstone). Just remember that only ATTACKING creatures can be untapped.
Mirror Universe
Q: My opponent activates their Mirror Universe – if I Disenchant it in response, will that stop its ability?
No – you aren’t allowed to play Disenchant here! Mirror Universe is sacrificed as part of using its ability, so there is nothing left in play to Disenchant.
Nevinyrral’s Disk
Q1: My opponent activates the Disk – if I Disenchant it in response, will that stop everything being destroyed?
No. You can Disenchant the Disk in response if you really want to, but it’s probably a waste of a Disenchant because the Disk’s ability will still resolve and destroy everything.
Q2: If I play Disenchant to destroy the Disk, is my opponent allowed to respond by using it?
Yes. If you try and Disenchant an untapped Disk, then Disenchant will go on the stack and the opponent can therefore respond to Disenchant by activating the Disk. You need to destroy the Disk whilst it’s still tapped (or whilst the opponent has no mana available) to prevent the world being blown up.
Sylvan Library
Q1: Can I play a card in between my normal card draw and using Sylvan Library? For example, if I draw Disenchant as my normal card draw for the turn, can I use it to disenchant Underworld Dreams before I use the Library?
Yes. Your normal card draw is always the first thing that happens in the draw step. In this example, if you’re lucky enough to draw a Disenchant you can disenchant Underworld Dreams before Sylvan Library’s trigger resolves. Note that you will still suffer 1 damage from the Underworld Dreams in respect of your normal card draw, as you drew it before the Dreams was destroyed.
Q2: There is a Howling Mine in play, and I have a Sylvan Library. Both trigger in my draw step. Am I allowed to choose which order their triggers happen in?
It depends!
- if the Howling Mine is yours, both triggers are yours and you can therefore choose the order.
- if the Howling Mine is your opponent's, the Howling Mine trigger resolves first, before you can use the Sylvan Library. This is because when two sets of triggers would happen at the same time, the active player’s triggers go on the stack first, with the non-active player’s triggers above them (and so the non-active player’s triggers resolve first). This is often known as the “APNAP” rule (“ActivePlayerNonActivePlayer”).
Q3: If the Howling Mine ability resolves first then can I use the card I drew with Howling Mine as one of the 1-2 cards that I put back on my library with Sylvan Library?
Yes. It’s a card you drew “this turn” and Sylvan Library’s only requirement is that cards put back are drawn this turn. You could also put back cards drawn from any instant-speed source such as Jayemdae Tome, Ancestral Recall, Sage of Lat-Nam, that you have activated before the Sylvan Library trigger resolves. Note that once the Sylvan Library trigger resolves and you draw 2 cards from it, you must then finish resolving it by deciding to put 0-2 cards back (you can’t, for example, draw 2 with the Sylvan Library, then – before deciding what to put back – play Ancestral Recall to draw 3 more).
Q4: If I have two Sylvan Libraries in play, how do I resolve them?
The key thing to remember is to completely resolve the first Sylvan Library’s effect before you move on to the second one. In your draw phase what happens is therefore:
- Draw your normal card draw for the turn.
- Resolve Sylvan Library #1. Firstly draw 2 cards, then put back on your library 0, 1 or 2 cards (which can be ones that you just drew with Sylvan Library and/or your normal card draw for the turn). You then lose 0 life, 4 life or 8 life depending upon how many you put back.
- Resolve Sylvan Library #2. Firstly draw 2 cards. Note that if you put 2 cards back on top of your library with Sylvan #1 then you will just draw those same two again! If you put 1 card back with Sylvan #1 then you will draw that one again plus one previously unseen card. Only if you drew both cards with Sylvan #1 and lost 8 life will you get to see 2 brand new cards with Sylvan #2. You will then have to put back on your library 0, 1 or 2 cards (which can be either the ones that you just drew with Sylvan #2, or ones you drew and kept with Sylvan #1, or your normal card draw for the turn). You then lose a further 0 life, 4 life or 8 life depending upon how many you put back.
Finally, whilst you won’t usually want to, it is possible to play Instants and use abilities between Sylvan #1 resolving and Sylvan #2 resolving.
Tawnos’s Coffin
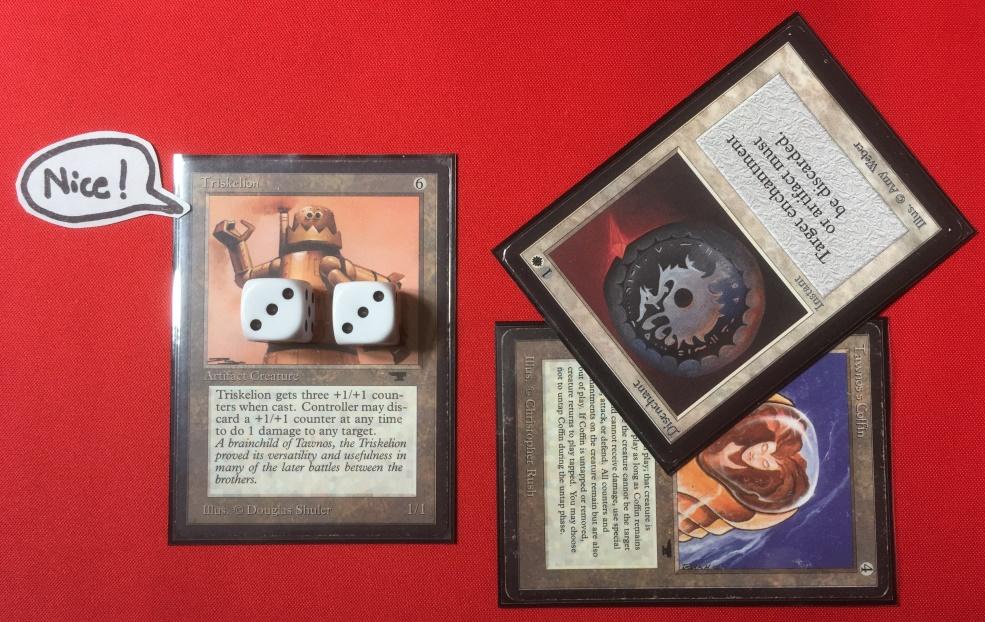
Q1: I have a Triskelion with three +1/+1 counters on it. My opponent puts it into their Tawnos's Coffin. I then Disenchant the Coffin. How many counters does Triskelion come back into play with?
Six. Three from its own ability AND three more from the Coffin.
If this seems odd, remember that whereas to you it feels like the ‘old’ Triskelion is returning to play, the rules of Magic see a ‘new’ Triskelion entering play (so it gets 3 counters) and then Tawnos’s Coffin says “I noted three counters when this was exiled, so please add three counters now it’s back” (so it gets another 3).
Q2: I moved 3 counters off my Tetravus to create 3 Tetravites, then put my 1/1 Tetravus into my Tawnos’s Coffin. If I later untap the Coffin, does Tetravus come back with 3 new counters?
Yes it does, for the same reason as Triskelion above (the game sees it as new Tetravus entering play). However, remember that any Tetravites created from the ‘old’ Tetravus before it was exiled would no longer be able to move back onto the ‘new’ Tetravus, as Tetravites can only be moved back onto their original ‘mother’ Tetravus.
Timetwister
Just a general reminder – DON’T shuffle in Timetwister itself! After it finishes resolving place it in your graveyard (it is NOT removed from the game) and also be careful not to shuffle in any cards that HAVE been removed from the game (eg Recall, or creatures exiled by Swords to Plowshares). Just casually wandering around tables at the Urborg Feast I saw all three of those errors made!
Time Vault
Q1: If I skip a turn to untap Time Vault do I still get to untap all my other things?
No – you have to skip your entire turn, including your untap step. You will just untap your Time Vault, then it will be the opponent’s turn.
Q2: I tap Time Vault to take an extra turn on the same turn someone already played Time Walk or tapped another Time Vault. Who gets the next turn?
Whoever most recently gained an extra turn will take the next turn – but you may want to read the answer under Fork above for a more detailed explanation.
Transmute Artifact
Q1: Can I tap a Mox, Sol Ring or other mana-producing artifact that I am sacrificing to help pay the cost difference between itself and the artifact for which I am searching?
Only if you float the mana from the artifact that you intend to sacrifice BEFORE Transmute Artifact begins to resolve. You won’t be able to activate its mana ability while Transmute is resolving because sacrificing that artifact is the first thing you do when resolving Transmute Artifact - it will therefore be gone by the time you’re required to pay any extra mana cost .
Q2: Can I sacrifice a Su-Chi to Transmute Artifact and use the mana generated by the Su-Chi to pay the difference in costs?
No, you cannot. The mana generated by the Su-Chi is a triggered ability that will resolve only after Transmute has finished resolving.
Triskelion
Q: Can my Triskelion with three +1/+1 counters block and kill a 3/3 War Mammoth, and then later in the turn remove the three counters to deal three damage to my opponent?
No. After combat the Triskelion will be a 4/4 creature with 3 damage marked on it (from the mammoth). If you remove one counter, it then becomes a 3/3 creature with 3 damage marked on it. At the point it will die as a state-based effect before you get the opportunity to remove further counters.
Underworld Dreams
Q1: My opponent and I are both on 1 life and they have Underworld Dreams in play. I draw a card and it’s a Lightning Bolt! Am I dead or can I bolt them?
You can bolt them! When you draw the card an Underworld Dreams trigger will go on the stack. In response to that trigger, you can bolt the opponent. They will be dead before the Underworld Dreams trigger resolves and kills you.
Q2: My opponent and I are both on 1 life and we BOTH have Underworld Dreams in play. I play Wheel of Fortune. Who wins?
Hang on a minute – we need to come at this one slowly, because it’s complicated!
Firstly, note that you both discard your hand and draw 7 cards before we can even start to think about who might have won the game. That’s because you need to fully resolve Wheel of Fortune before anything else can happen.
Secondly, 14 Underworld Dreams triggers go on the stack. Because of the APNAP rule (see Sylvan Library above) your 7 triggers go on the stack first with your opponent’s 7 on top of them.
Thirdly, both players (starting with you) will have the opportunity to respond to the first trigger with Instants or abilities. This could be very relevant if one of you has drawn an Instant that gains life or deals damage!
Finally, once both players pass priority, the first trigger will resolve. As your opponent’s triggers are on the top of the stack, the first one that resolves will kill you, and they win. The other 13 triggers never get to resolve.
Note that you will in fact lose the game if you have any amount of life between 1 and 7, because all 7 of your opponent’s triggers will resolve before any of yours resolve and start dealing damage to them.
Wheel of Fortune
Q: I have 2 cards left in my library and my opponent has 5. She plays Wheel of Fortune. What’s the game result?
It’s a draw. You both try to draw 7 cards. Neither of you is able to do so, so you both lose the game, making the game a draw. It doesn’t matter that you run out of cards “first” – the game only checks to see who’s won or lost once Wheel of Fortune is completely finished resolving, by which time you’ve both lost.
Subscribe to:
Posts (Atom)